To access My Health Record, a patient must have an IHI number recorded in their Patient Details on Bp VIP.net. Ensure that your Patient Details (F3) screen has the IHI Number field.
Add IHI field to the Patient Details User Defined Form
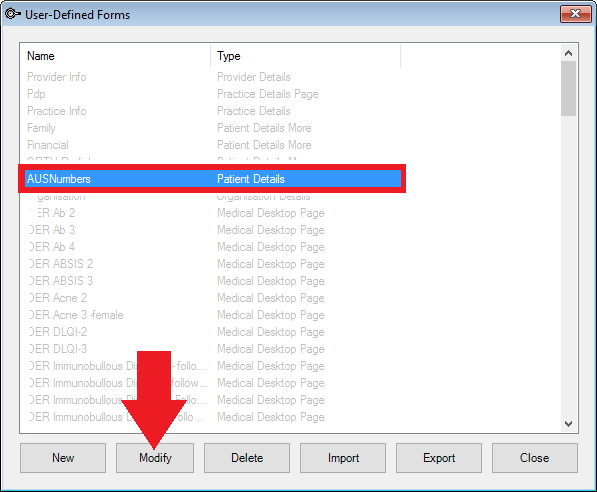
- Click Setup > User-Defined Forms and select the Patient Details UDF and click Modify.
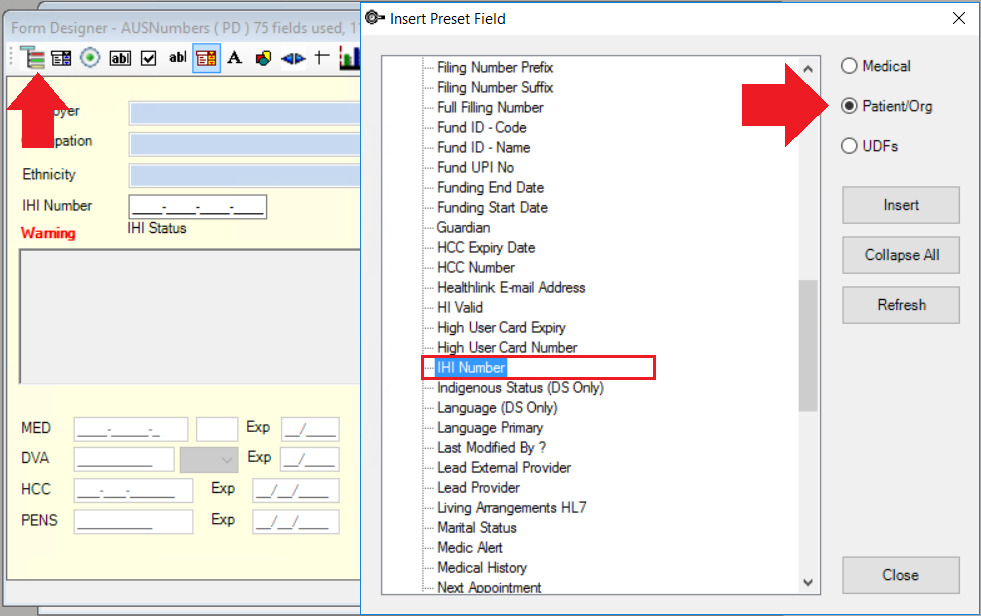
- On the Form Designer, click the Preset button, select the field type as Patient/Org.
- Click the + next to the Patient group and select 'IHI Number' and click Insert.
- Position the IHI Number field on the UDF and click F12 to save.
- Click F3 to reopen the Patient Details screen and verify the field has been added.


Record and verify the patient IHI number
There are various different ways to verify the IHI number for the patient.
- If you have the IHI number for the patient, enter it in the IHI Number field and click OK.
- If you do not have the IHI number, you can run verifications using the patients Medicare or DVA numbers.
- Enter the patient details including the Medicare or DVA number into the Patient Details (F3) screen and click the HI Verification button at the bottom of the screen.
- The patient information is populated and the ID Number Search with Medicare Number is selected by default. Click Search.
- Click OK on the Search Results pop-up.
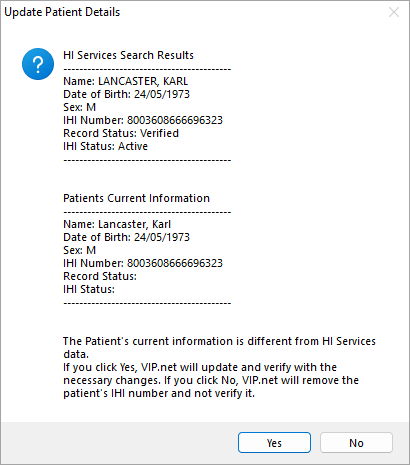
- Click Yes to the Update Patient Details message to populate the IHI number into the Patient Details screen.
- Click OK on the Patient IHI Number/Status Updated message.
- Click Close.
- The details will have populated back into the Patient Details screen and the verification status is recorded.
Bp VIP.net will automatically verify the number and a Verified Active date and time will be displayed below the IHI Number field. The MHR button in the tool bar will display with a green tick to show that this patient is verified and opted in to My Health Record by default.
A green bullseye will display next to the patients age to indicate successful verification. A black bullseye indicates the IHI number has not been recorded and validated.

IMPORTANT When an IHI number is recorded for a patient, Bp VIP.net automatically verifies the number on saving the patient's details. If the number is not verified, the entered number will not save and a warning will be displayed. It is advisable to store the number provided in the Notes section until you can verify the validity of the number if this happens. If you delete part of the number in error, the automatic validation will delete the rest of the number and you will either need to obtain the number again from the patient, or use their Medicare and DVA numbers to verify the IHI number again.

Update patient details with HI services
- Open the Patient details (F3) screen.
- Enter an IHI number or click HI verification and use the Search.
-
The HI Services Search Results will display the correct patient details above the current patient details entered in Bp VIP.net:
- Select Yes to update the Patient details screen with the information recorded by HI services.
- Select No to cancel verification of the IHI number and remove.

Accessing My Health Record
IMPORTANT The following My Health Record screen and button on the tool bar will be available in the Topaz release of Bp VIP.net.
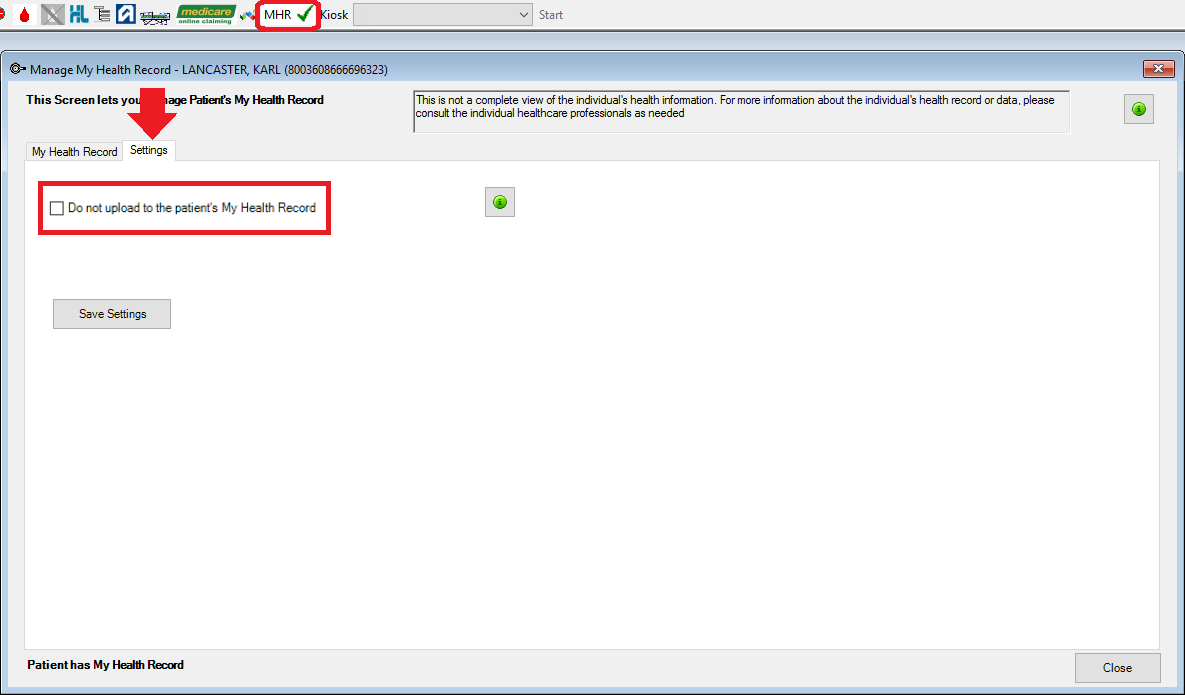
Access to a patient's My Health Record can either be done through the MHR button on the tool bar or through clicking Patient > Manage My Health Record.
Bp VIP.net will upload relevant patient documents to the record by default. If a patient has advised their provider that they do not wish for their documents to be automatically uploaded, this can be updated by clicking on the Settings tab and ticking Do not upload to the patient's My Health Record. Select Save Settings to confirm the change.

The MHR button in the tool bar also indicates the patient's activity on My Health Record.

- The grey cross indicates the patient is not IHI verified and therefore there is no access to My Health Record.
- They green tick indicates the patient is IHI verified and there is access to My Health Record.
- The envelope indicates that there are new uploaded documents in the patient My Health Record.
- The red cross indicates that the patient is IHI verified but either does not have a My Health Record or access is restricted and an access code can be provided by the patient. Please see the My Health Record page for more information on setting access codes on My Health Record. Accessing the My Health Record will prompt the access code to be added into the My Health Record - Access Level screen.
Last modified: 9 June 2022